Battery switch on travel trailer function is crucial for safe and efficient power management. Understanding your travel trailer’s battery switch – its type, location, and operation – is key to preventing electrical issues and maximizing your RV experience. This guide will walk you through everything you need to know, from identifying different switch types to troubleshooting common problems and performing routine maintenance.
We’ll cover various switch types, their pros and cons, and how to safely operate them. Learn about ideal switch placement, essential safety precautions, and common troubleshooting steps. We’ll also explore how the battery switch interacts with other systems in your RV, like solar panels and inverters, and provide guidance on upgrades and replacements.
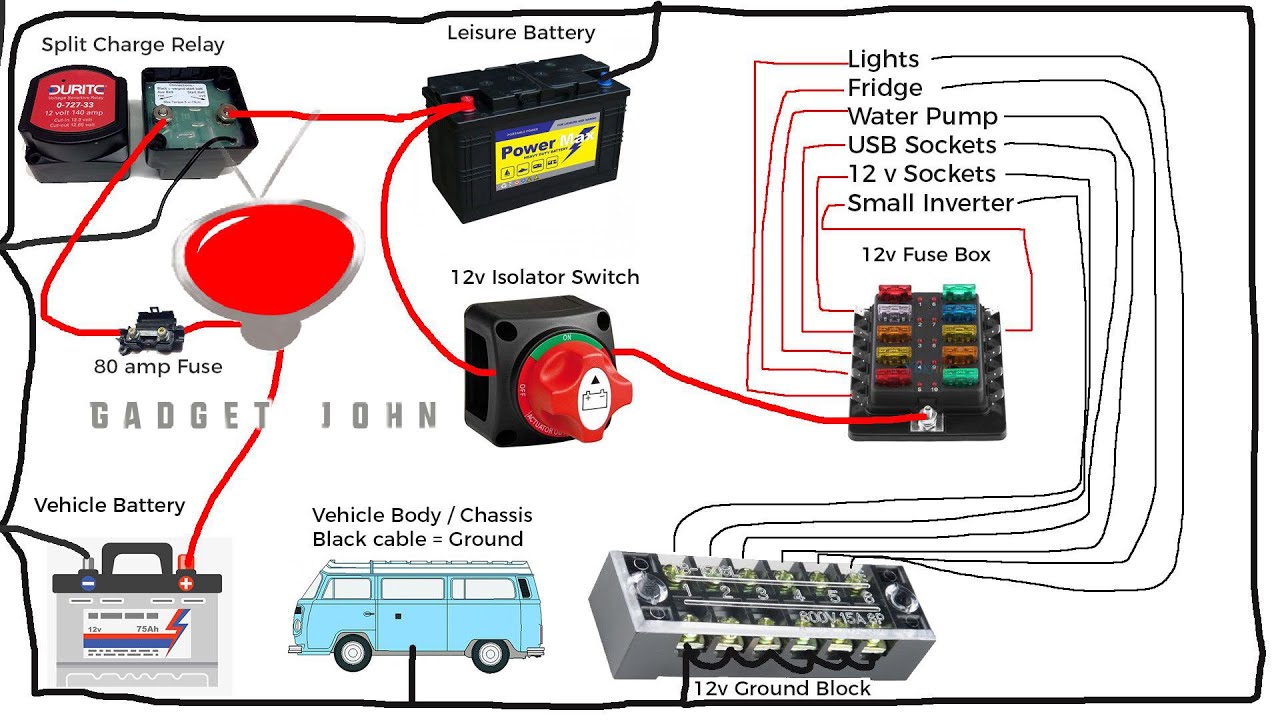
Battery Switch Types in Travel Trailers: Battery Switch On Travel Trailer Function
Choosing the right battery switch for your travel trailer is crucial for managing power and protecting your electrical system. Different switches offer varying levels of control and safety features, impacting both convenience and the longevity of your batteries. Understanding these differences will help you make an informed decision.
Battery Switch Types
Travel trailers typically utilize several types of battery switches, each with its own advantages and disadvantages. The most common are single-pole, double-pole, and disconnect switches. These switches control the flow of power from your trailer batteries to the various electrical components.
Single-Pole Battery Switches
Single-pole switches control only one side of the battery circuit (either positive or negative). They’re generally the simplest and most affordable option. However, they offer limited protection and are typically only used in simpler systems.
Double-Pole Battery Switches
Double-pole switches control both the positive and negative sides of the battery circuit simultaneously. This provides better safety and prevents accidental shorts. They are more common in travel trailers due to their enhanced safety features. This type of switch offers better protection against accidental shorts and is more versatile.
Disconnect Switches
Disconnect switches, often referred to as battery disconnect switches, completely isolate the batteries from the trailer’s electrical system. This is a crucial safety feature, particularly when the trailer is stored for extended periods to prevent accidental drain and potential damage. They are essential for safety and long-term battery health. Many disconnect switches include a key to prevent accidental operation.
So, you’re an audiophile who travels? Awesome! Check out this guide on creating the perfect audiophile travel setup to ensure your ears are always happy on the go. It’s crucial to protect your investment, though, so remember to get travel insurance. Seriously, look into Aon travel insurance – it’s worth the peace of mind, especially when you’re carrying around expensive gear.
Plan ahead, pack smart, and enjoy the music wherever your adventures take you!
Comparison of Battery Switch Types
| Switch Type | Features | Pros | Cons | Typical Cost |
|---|---|---|---|---|
| Single-Pole | Controls one side of the circuit (positive or negative). | Simple, inexpensive. | Limited safety, less versatile. | $10 – $30 |
| Double-Pole | Controls both positive and negative sides simultaneously. | Improved safety, more versatile. | More expensive than single-pole. | $20 – $50 |
| Disconnect | Completely isolates the batteries from the system. Often includes a key switch for added security. | Enhanced safety, prevents battery drain during storage. | More expensive than other types, may require additional wiring. | $30 – $80 |
Battery Switch Location and Accessibility
Finding your travel trailer’s battery switch quickly and easily is crucial for safety and maintenance. A poorly located switch can lead to delays in emergencies or make routine checks unnecessarily difficult. This section will discuss ideal placement and the importance of accessibility.The typical locations for battery switches in travel trailers vary, but they generally fall within a few key areas.
Often, they’re found near the battery compartment itself, providing direct access for switching power on or off. Another common location is within a dedicated electrical panel or breaker box, usually located inside the trailer near the entryway or kitchen area. Less common, but still possible, is mounting the switch on an exterior wall near the battery compartment, offering external access.
Ideal Battery Switch Placement
An ideal battery switch location prioritizes safety, ease of access, and protection from the elements. Imagine this: the switch is housed in a weatherproof box mounted on the exterior wall of the trailer, near but not directly inside the battery compartment. This box should be easily visible and reachable, perhaps at knee-height, avoiding awkward bending or stretching. The box itself should be securely fastened and made of durable, weather-resistant material, capable of withstanding rain, snow, and extreme temperatures.
The switch itself should be clearly labeled, with large, easy-to-understand markings indicating the “ON” and “OFF” positions. The proximity to the batteries allows for quick disconnection in case of emergencies, while the exterior location avoids the need to open the potentially hazardous battery compartment every time you need to switch the power. Furthermore, this setup keeps the switch readily accessible, even when the trailer is parked in different locations or when it’s inconvenient to enter the trailer itself.
The placement also allows for easy visual inspection of the switch, ensuring no damage or corrosion has compromised its function.
Troubleshooting Common Battery Switch Issues
Your travel trailer’s battery switch is a crucial component, ensuring power to your appliances and systems. Problems with this switch can leave you stranded without power, so understanding common issues and how to troubleshoot them is essential. This section will guide you through identifying and resolving some of the most frequent problems.
Corrosion on Battery Switch Terminals
Corrosion is a common culprit in battery switch malfunctions. Over time, exposure to the elements can cause a build-up of corrosion on the terminals, hindering the flow of electricity. This build-up creates resistance, leading to weak connections or a complete power failure. The severity of corrosion can range from a light green film to a thick, crusty layer.To troubleshoot, visually inspect the terminals.
If corrosion is present, carefully clean them using a wire brush or sandpaper. Ensure you disconnect the battery before cleaning to avoid accidental shocks. For heavy corrosion, you may need a battery terminal cleaner specifically designed to dissolve the build-up. After cleaning, apply a dielectric grease to prevent future corrosion. This grease helps to seal the terminals and repel moisture.
Reconnect the battery and test the switch.
Loose Connections at the Battery Switch
Loose connections, like corrosion, impede the flow of electricity. Vibrations from travel can loosen the connections over time, creating intermittent power or a complete loss of power. This is often accompanied by flickering lights or intermittently working appliances. Check for any signs of looseness by carefully inspecting the connections at the switch.Troubleshooting involves tightening all connections. Ensure the cables are securely attached to the terminals and the switch itself is firmly mounted.
If the terminals are damaged, they may need to be replaced. Again, disconnect the battery before working on the connections. After tightening and reconnecting, test the functionality of the switch.
Battery Switch Failure
In some cases, the battery switch itself may fail. This can be due to wear and tear, damage from exposure to the elements, or simply age. Symptoms of switch failure can include a complete lack of power despite clean terminals and tight connections, or the switch failing to switch on or off reliably.Troubleshooting switch failure requires a multimeter. First, ensure the battery is providing power.
Then, test the continuity of the switch itself. If the switch shows no continuity in the “on” position, the switch is likely faulty and needs replacement. Replacing the switch involves disconnecting the battery, removing the old switch, and installing the new one, ensuring all connections are secure.
Troubleshooting Flowchart
This flowchart Artikels the troubleshooting steps for a non-functioning battery switch:“`[Start] –> Is the battery charged? –> Yes/NoNo: Charge battery –> Is the battery charged now? –> Yes/NoNo: Replace battery –> Yes: Proceed to next stepYes: Inspect battery switch terminals for corrosion –> Yes/NoYes: Clean terminals, apply dielectric grease, test switch –> Does the switch work? –> Yes/NoNo: Inspect connections for looseness –> Yes/NoYes: Tighten connections, test switch –> Does the switch work?
–> Yes/NoNo: Test switch continuity with multimeter –> Does the switch show continuity? –> Yes/NoNo: Replace battery switch –> Does the switch work now? –> Yes/NoYes: [End]No: Seek professional assistance –> [End]“`
Battery Switch Maintenance and Upkeep

Keeping your travel trailer’s battery switch in good working order is crucial for reliable power. Regular maintenance prevents problems and ensures your batteries are always ready when you are. Neglecting this simple task could lead to frustrating breakdowns and costly repairs down the road. A little preventative care goes a long way.Proper maintenance involves regular inspection and cleaning, using the correct tools, and following safe practices.
So, you’re an audiophile who loves to travel? Awesome! Check out this guide on creating the perfect audiophile travel setup to ensure your listening pleasure isn’t compromised on the road. And speaking of travel, don’t forget to sort out your insurance! Getting Aon travel insurance beforehand is a smart move – peace of mind is priceless, especially when you’re carrying expensive audio gear.
Remember to pack light but smart!
Failing to do so can damage the switch, potentially leading to electrical shorts or even fire hazards. Always prioritize safety when working with electrical components.
Maintenance Schedule
A regular inspection schedule is essential for early detection of potential issues. Aim to inspect your battery switch at least twice a year, or before and after each extended storage period. This allows for early detection of corrosion, loose connections, or other problems. A more frequent inspection might be necessary if your trailer is exposed to harsh weather conditions or if you notice any unusual behavior from your battery system.
Cleaning Procedures
Cleaning the battery switch removes corrosive buildup that can hinder performance and create safety hazards. Start by disconnecting the battery’s negative terminal to prevent accidental shorts. Use a wire brush or a suitable cleaning tool to remove any corrosion from the switch terminals and connections. A mixture of baking soda and water can help neutralize acid buildup. After cleaning, apply a thin layer of dielectric grease to protect the terminals from future corrosion.
Remember to reconnect the negative terminal only after the cleaning and greasing is complete.
Appropriate Tools and Techniques
Using the correct tools and techniques ensures safety and effectiveness. Always disconnect the negative battery terminal before starting any maintenance work. Never use excessive force when tightening connections; this could damage the switch or its components. Ensure that all connections are clean and secure before reconnecting the battery.
Recommended Tools and Supplies
To perform routine battery switch maintenance, you’ll need a few basic tools and supplies.
- Wire brush: For cleaning corrosion from terminals.
- Baking soda and water: To neutralize acid buildup.
- Dielectric grease: To protect terminals from corrosion.
- Screwdrivers (Phillips and flathead): To access and tighten connections (if necessary).
- Safety glasses: To protect your eyes from debris and chemicals.
- Gloves: To protect your hands from corrosive materials.
- Wrench (appropriate size): For disconnecting battery terminals.
Integrating Battery Switches with Other Systems
Your travel trailer’s battery switch isn’t an isolated component; it’s a crucial traffic controller for your electrical system, directing power flow between various sources and appliances. Understanding its interaction with other systems is key to efficient and safe operation. This section details how the battery switch manages power flow and the consequences of malfunction.The battery switch acts as the main on/off switch for your house batteries, controlling power distribution to the rest of your trailer’s electrical system.
This includes everything from lights and water pumps to your refrigerator and air conditioner (if it runs off the batteries). It’s the central point where power from your batteries is either allowed to flow or is completely cut off. This is essential for safety, preventing accidental drain of your batteries and potential damage to electrical components.
Interaction with Solar Panels
Solar panels, if installed, charge your house batteries. The battery switch’s position affects how this charging process works. With the switch in the “off” position, the solar panels will likely still charge the batteries, but the power generated isn’t available for use in the trailer. In the “on” position, power generated by the solar panels can be directly used by the trailer’s appliances.
A faulty switch might prevent the solar panels from charging the batteries, or it might allow the solar panels to overcharge them.
Interaction with Converters
A converter transforms 120-volt AC power from your campsite’s hookup into 12-volt DC power for your house batteries. The battery switch, when “on,” allows the converter to charge the batteries and power appliances directly from the batteries. If the switch is “off,” the converter might still charge the batteries (depending on its design), but nothing in the trailer will function unless it’s directly plugged into the 120-volt AC system.
A malfunctioning switch can disrupt the charging process, preventing the batteries from being fully topped up when plugged into shore power.
Interaction with Inverters
Inverters convert 12-volt DC power from your batteries into 120-volt AC power for running AC appliances like microwaves or coffee makers. A properly functioning battery switch is necessary to supply the inverter with the necessary DC power. With the switch in the “off” position, no AC power will be available from the inverter. A faulty switch might interrupt power to the inverter, even if the batteries are charged, resulting in your AC appliances not working.
Impact of a Faulty Battery Switch
A faulty battery switch can lead to a range of problems, from complete power failure to over-discharged batteries and damage to electrical components. For example, a switch that remains partially on might slowly drain your batteries even when you think they are disconnected. Conversely, a switch that consistently fails to connect could prevent your batteries from charging, rendering much of your trailer’s electrical system unusable.
The severity of the impact depends on the nature of the fault and the other systems in your travel trailer.
Upgrading or Replacing a Battery Switch
Upgrading or replacing your travel trailer’s battery switch is a straightforward process that can significantly improve your RV’s electrical system reliability and safety. Whether you’re dealing with a faulty switch, upgrading to a more feature-rich model, or simply want to improve your system’s longevity, understanding the process and available options will ensure a smooth and successful installation. This section will guide you through the steps involved and help you choose the right replacement.
Step-by-Step Guide for Replacing or Upgrading a Travel Trailer Battery Switch
Replacing your battery switch involves disconnecting the old switch, carefully wiring the new one, and securing it in place. Always remember to disconnect the negative battery terminal before starting any electrical work. This prevents accidental shorts and protects you from electrical shock.
- Disconnect the Battery: Locate your RV’s negative battery terminal and disconnect it using a wrench. This is crucial for safety.
- Remove the Old Switch: Carefully remove the old battery switch from its mounting location. Take photos or make detailed notes of the wiring connections before disconnecting anything. This will be invaluable when installing the new switch.
- Prepare the New Switch: Unpack your new battery switch and examine its wiring diagram. Compare this diagram to your notes from the old switch to ensure you understand the correct wiring configuration.
- Wire the New Switch: Connect the wires to the new switch according to the wiring diagram. Double-check all connections to ensure they are secure and correctly matched. Use appropriately sized wire nuts or crimp connectors for a secure and reliable connection.
- Mount the New Switch: Securely mount the new battery switch in its designated location. Ensure it is firmly attached and easily accessible.
- Reconnect the Battery: Reconnect the negative battery terminal. After reconnection, test the new switch to verify all functions are working correctly.
- Test the System: Thoroughly test all battery functions to ensure the switch is operating as expected. Check all connected appliances and lights to verify power is correctly routed.
Comparison of Battery Switch Brands and Models, Battery switch on travel trailer function
Several reputable brands manufacture battery switches for RVs, each offering different features and price points. Some popular brands include Blue Sea Systems, Perko, and Sterling Power. Features to consider include amperage rating, the number of batteries supported (single or dual), and the type of switch (rotary or rocker). For example, a Blue Sea Systems 7610 is a popular choice for its robust construction and clear operation, while a Perko switch might offer a more compact design.
Always choose a switch with an amperage rating that exceeds your battery bank’s maximum output.
Checklist for Choosing a Replacement Battery Switch
Before purchasing a replacement battery switch, consider these key factors:
- Amperage Rating: This should be higher than the maximum current draw of your battery bank. A higher rating provides a safety margin and prevents overheating.
- Number of Batteries: Determine if you need a switch for a single battery or a dual battery setup.
- Switch Type: Rotary switches are generally more durable, while rocker switches offer a more modern look. Consider your personal preference and the space available.
- Mounting Style: Ensure the switch’s mounting style is compatible with your existing setup. Some switches require panel mounting, while others might have different configurations.
- Size and Dimensions: Measure the space available in your RV’s electrical panel before purchasing a new switch to ensure a proper fit.
- Budget: Set a budget and compare prices from different vendors to find the best value for your needs.
Mastering your travel trailer’s battery switch is a simple yet powerful way to enhance your RV adventures. By understanding its function, performing regular maintenance, and knowing how to troubleshoot common issues, you’ll ensure a smooth and reliable power supply for all your on-the-road needs. Remember, safety is paramount; always prioritize proper procedures when working with electrical systems.
Common Queries
What happens if I leave my battery switch on all the time?
Leaving your battery switch on constantly can drain your batteries, especially if you have parasitic draws (small electrical loads even when the trailer isn’t in use). It’s best to turn it off when not using the trailer for extended periods.
How do I know which type of battery switch I have?
Check the switch itself for markings or labels indicating the type (e.g., single-pole, double-pole). You can also consult your trailer’s wiring diagram or owner’s manual.
My battery switch is corroded. How do I clean it?
Disconnect the battery first! Then, use a wire brush and baking soda solution to clean the terminals and switch contacts. Apply a corrosion inhibitor afterwards.
Can I replace my battery switch myself?
Yes, but it requires basic electrical knowledge and working safely with 12V systems. If you’re unsure, consult a professional RV technician.
